I've hinted at a sweet baby name banner for about a month now. The shower for the beautiful mom-to-be has now happened, so I can finally show you the banner and tell you how to make one.
What you need:
Coordinating fabric (I used 5 fat quarters, which was plenty for 6 blocks)
Batting (I used scraps from another project)
Binding - wide double fold (The store was out so I had to buy single fold and iron it in half myself.)
Felt
Embellishments (I used buttons)
The "Jude" banner is approximately 42" long. My finished blocks are approx. 7" square. Your finished banner - and the exact amount of fabric you will need - depends on the number of blocks you need to spell your chosen name. Since Jude is a short name, I added two "picture" blocks. For a 3-4 letter name, I suggest adding 2 blocks; 1 block for a 5-6 letter name; and for any longer names, just the letters should be plenty long.
1. Cut a 5 1/2" square for each block. The center panel of each block is 5" finished.
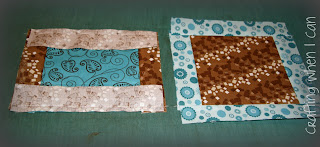
2. Cut 1 1/2" by 5 1/2" strips - two strips per block.
3. Cut 1 1/2" by 7" strips - two strips per block.
(Pretend not to notice the strips in the picture are actually 6 1/2" long. When you're making something up as you go, mistakes are really easy to make.)
4.Cut 7" squares for the backs of the blocks.
5. Cut 7" squares of batting.
6. Sew a 5 1/2" strip to opposite sides of each 5 1/2" square block center. *All seams are 1/4" unless otherwise noted.* Press the strips away from the square.
7. Sew a 7" strip to each side of your block, opposite the sides you sewed the previous strips. Press each strip away from block.
8. At this point, it's time to cut your letters and any other shapes you want to add. I used Word Art in Microsoft Word to make my letter templates. I used Arial Black, typed one letter at a time, and formatted the Word Art size to 3"x4". This way all my letters would be the same size. I printed each letter twice, then free-handed a line about 1/8" larger than one set of letters. Cut out the smaller letters from your main color of felt, and the larger letters from the letter background color.
For any pictures you want to use on extra blocks, you can use clip art, Google images, cookie cutters, whatever you can find.
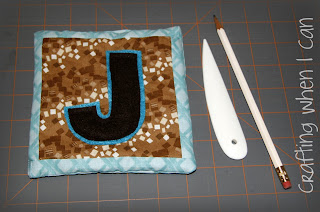
9. Arrange your letters and shapes on the blocks and stitch close to the edge of each. I layered my main letter and background and stitched through both at once.
10. Layer your batting, block front, and backing piece as shown (the block front and backing piece should be right sides together).
11. Stitch around the square, leaving about 1 1/2" on the top edge open for turning. (If I made another banner, I would only stitch around the sides and bottom, leaving the top completely open.)
12. Turn the blocks right side out and press. Use a point turner or dull pencil point to poke out the corners. Don't worry about stitching up the opening you used to turn the square out. This will be enclosed in the binding later.
13. Stitch "in the ditch" between your main block piece and the borders.
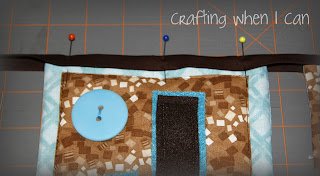
14. Decide where you want to use your embellishments and stitch in place.
15. Lay out your blocks (I spaced mine 1" apart) and cut your binding that length plus 24". Leave 12" of binding at each end (for tying) and pin your blocks, enclosing the top edge in the fold of the binding. Fold each binding end in about 1/4". Sew along the full length of the binding, removing the pins as you go.
16. Cut two 13" lengths of binding. Fold in each end 1/4". Sew along the length of both binding pieces. Place at the ends of your banner, overlapping the beginning or end block about 1". Sew in place at the end of the binding and at the edge of the block.
And that's it! You can tie the banner to the front of the crib, a shelf with pegs, or decorative knobs on the wall. I believe every baby should have something that was handmade just for them!
I hope my instructions were clear enough to follow. If you have any questions, please let me know. I'd be glad to elaborate on any of the steps.
Happy crafting,
Julie


Wow - quite the masterpiece. Almost makes me want to have another baby! =)
ReplyDelete