Love Story 3 column

Saturday, September 22, 2012

No-Sew Trick-or-Treat Bag

My husband and I have been volunteering at our church's Fall Festival for years, and for the last two years, we had a little someone to take with us. And both times, we realized after we got there she didn't have anything to put her candy in. Okay, you got me. When she was 11 months old, the candy was really just for us! But now that Annelise is almost 3, she is definitely going to need a bag for her candy.

When I was growing up, you pretty much had one choice for trick-or-treating:
Source: Amazon.com

Well, that was fine 30 years ago, but I just had to make something cuter, right? Besides, storing a plastic pumpkin the rest of the year is not ideal. We already use up valuable closet space for Easter baskets. So here is a super easy, no-sew trick-or-treat bag:


Would you like to make one? Here's what you need:

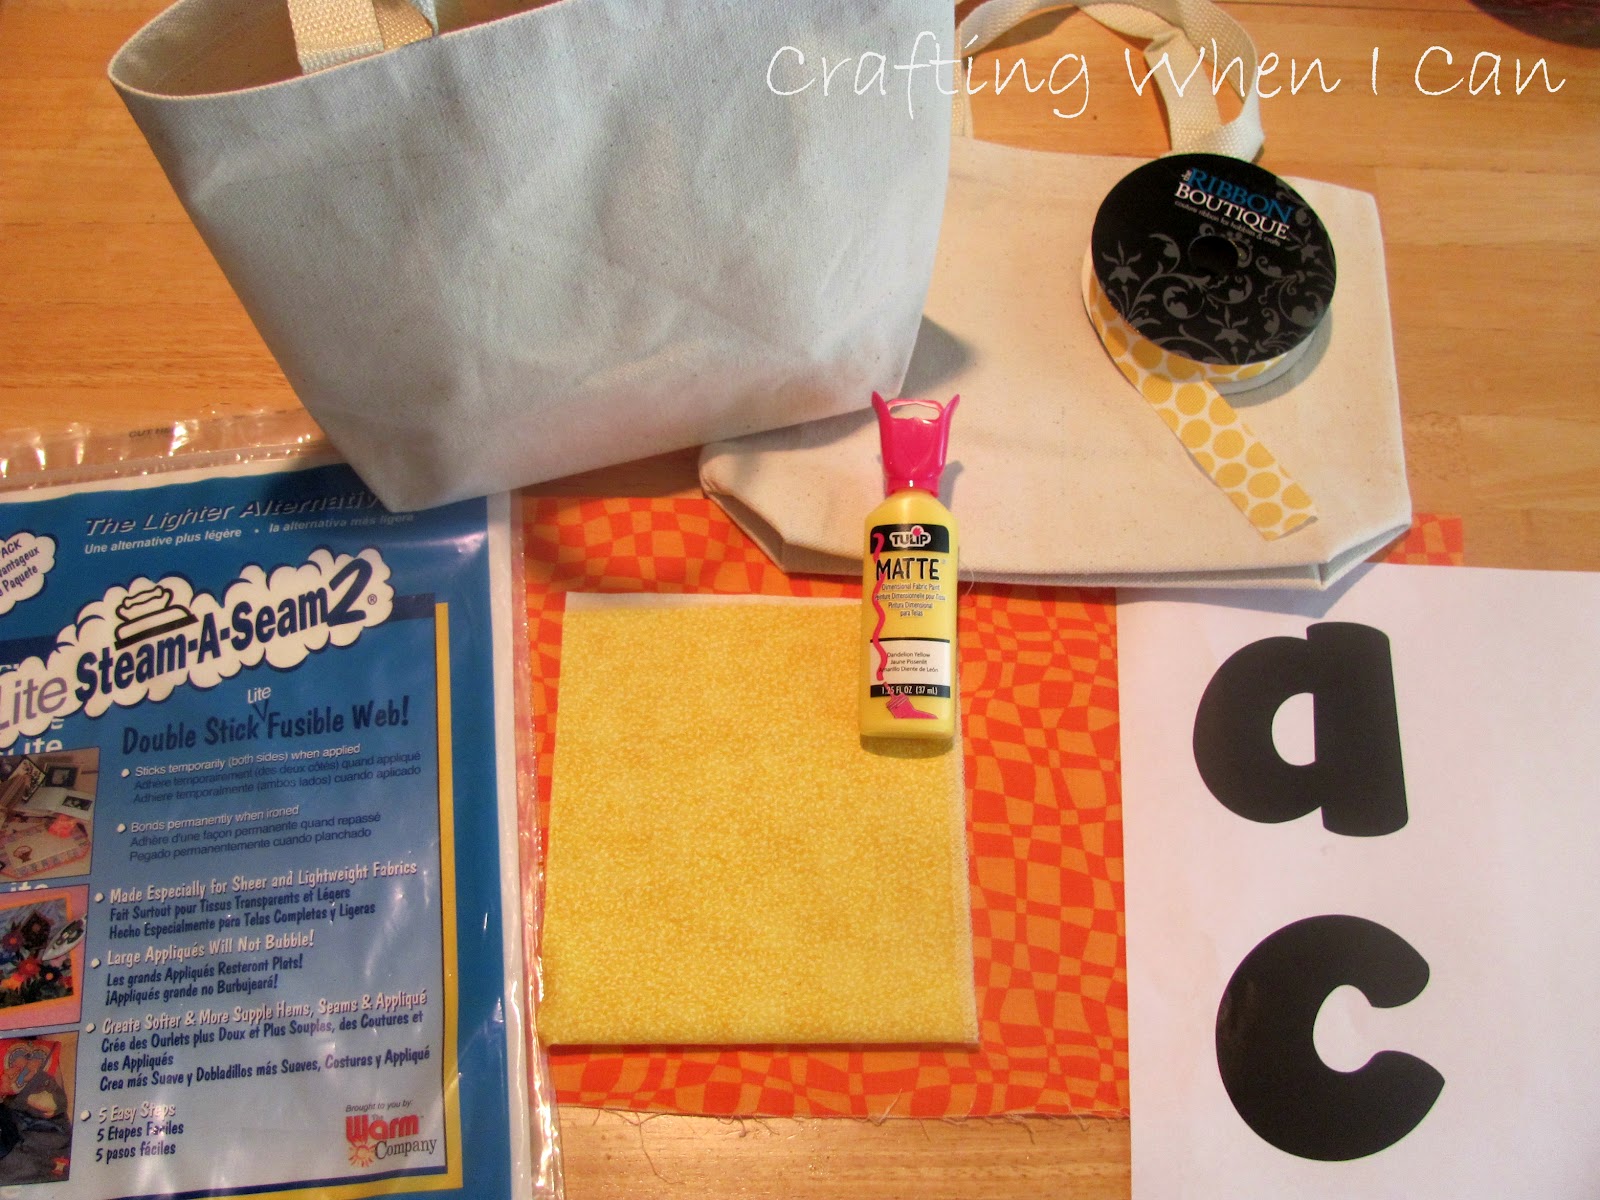
Fabric Tote (mine were $7.99 for 4 at Hobby Lobby)
Scrap Fabric
Fusible Web
Ribbon
Fabric Paint
Printout of initial


For my letters, I used Janda Manatee from dafont.com. I made each letter using Word Art in Microsoft Word, and they are about 3" square. I also used a bowl to trace the background circle - the diameter was about 5 1/2". Trace your letter (in reverse) and circle onto the fusible web's paper backing. Cut loosely around each shape, remove one side of the paper backing (not the side you traced!) and set it in place on the back side of your fabric. Follow package directions to iron the fusible web in place.


Cut out your letter and circle along the traced lines. Remove the paper from the letter, center it on the circle, and iron it in place.


Then remove the backing from the circle and iron it to your tote.


At this point you could stop. The fusible web should hold everything just fine. But to add another dimension, I traced the letter and circle with fabric paint.


Here's a close-up of my edges. (Of course the closer you get, the more imperfections you see!)


I also made a simple bow and hot glued it to the bag. Now my 7 month old won't be carrying a treat bag this year, but I couldn't let her feel left out next year, so I made her bag now.


You could easily change up the look of this bag to suit your child - think superhero fabric for boys, their favorite colors, or something to match their costume. Or you could make one to use as a gift bag (that's a gift in itself) for another holiday - red and green for Christmas, cupcakes for a birthday, etc.

I'm super-excited to show you what I just made Caroline (the 7 month old) for Halloween. I just have to get a picture of her wearing it. Stay tuned...

Happy crafting,
Julie

Linking up here:
Sundae Scoop (I Heart Naptime)
Mop It Up Mondays (I Should Be Mopping the Floor)
Make It Wear It Thursday (The Train to Crazy)

Monday, September 17, 2012

Bed Rail Recover

Shortly after my oldest daughter's 2nd birthday, we moved her into her big girl bed. We bought the longest bed rail we could find - not just so she wouldn't roll out, but also to serve as a deterrent to getting out of bed. Don't get me wrong - she can still get in and out - but she knows when the rail goes up, it's sleepy time.

My problem came as a result of when the rail is down. Annelise's bed is so low that the rail doesn't hang straight down - it hangs at an angle where it hits the floor. So of course my daughter uses it as a ladder to climb into her bed. And after about 6 months of that kind of treatment, the top seam of the rail cover completely came undone. (She also kicks it before she falls asleep. I'm sure that had quite a bit to do with it, too.)


I found some white twill fabric at Hobby Lobby. I wanted a sturdy fabric that would hold up to Annelise, and possibly last long enough to use with Caroline in a few years. I thought about getting a coordinating color for her room, but went with plain white so it will go with Caroline's room later.

I laid out the fabric and traced the existing cover with the top seam at the fold of the twill. I cut the fabric about 1/2" outside the traced line. I thought about using velcro to fasten the bottom around the rail frame. But then I realized the zipper on the old cover was still in perfect shape. So I picked out the old zipper and reused it.


Here's a close-up of the new top corner. I started the side seam right where the frame started to curve down.

I also tried to solved the "ladder" issue. I gave Annelise a little window to put her foot in when climbing in. I cut out a 4"x6" hole on the inside and stitched bias tape around the raw edges.

And here's the new cover in place on Annelise's bed.

Here she is using the foot hole. Love that cheesy grin!!!

There she goes. Nap time!

And here is the reason I haven't A) posted lately, and B) had any time to make something to post about!
Our sweet little Caroline is 6 months old. She's crawling and pulling up to stand already (yikes!), and is completely a momma's girl. I'm thankful that she and her sister nap together most of the afternoon, but by the time I get them down for naps, I'm worn out from chasing them all morning. Whew! Together they keep me hopping.

I have lots of craft plans - a ton of things collected on Pinterest - I'm just looking for the time to get it done. One of the next things I'll be working on - Halloween costumes! I've completely sewn Annelise's first 2 costumes, but this year I'm going to combine some homemade items with store-bought things. Stay tuned...

Happy crafting,
Julie

Linking up here:
Sundae Scoop (I Heart Naptime)
Mop It Up Mondays (I Should Be Mopping the Floor )

Monday, July 16, 2012

Photo Wall Redo

Now that Caroline is 4 months old, it's time to add her pictures to the photo wall. I should have done this months ago, but I'm finding that once Annelise (the 2 1/2 year old) goes down for her nap, I would rather sit and do NOTHING than work on projects. Surely I'm not the only one who is exhausted by her toddler!

Here's our family photo wall before:
 Not too bad, but I wanted to add a collage frame with pics of the new baby, so some rearranging was in order.

Here's the entire wall looking toward the front door. (Sorry for the extreme afternoon sun. I took this while Annelise was napping.) This is pretty much just a hallway from the front door to the living room, so I couldn't get a straight-on picture.

 This is the new collage frame (from Hobby Lobby, of course!). More adorable pics from our newborn photo shoot. (Skyley Photography by Lori Smith - Houston area - find her on facebook).

Caroline's hospital portrait - 2 days old. These shaped frames seem to be all the rage right now, and Hobby Lobby has them! This one is 8x10, and I don't remember all the sizes they carry, but I know there were also 5x7s. There were a few shapes and colors to choose from.

 I had about 7 feet of wall to work with, but I wanted to leave a little room to add a couple of frames in the future. So I used about 6 feet by 3.5 feet on my dining table to lay out the frames until I was happy with the layout.

 Ready to go on the wall.

I went for a more linear layout this time. I love being able to walk past pictures of BOTH of my babies every day. Now we just need to have new family portraits made with all FOUR of us!

Happy crafting,
Julie

Friday, July 6, 2012

Ummm, I Had a Baby! (Is that a good excuse?)

Bless me, bloggers, for I have sinned. It's been 4 1/2 months since my last post. (Ha ha! No, I'm not Catholic.) So what's my penance? Instead of Hail Mary's, how about 8 Mod Podge projects? Hmmmm....

Well, I have a great excuse for not blogging. I had a baby. I know there are plenty of rock star moms out there who get posts up right after their baby is born. Well, I'm not a rock star - not even close! Who has time to craft, much less blog about crafts, with a newborn and a really energetic 2 1/2 year old? Not me - I'm worn out!

I've come to the conclusion in the last few days that my blog is called "Crafting When I CAN", not "All About Crafts." I can post about anything, right? And when I actually DO find myself having time for a craft project, I'll blog about that, too.

All right, on to the adorable baby pics. Here's a snapshot of my life for the last 4 1/2 months...

 So here I was on February 11, two days before my due date, Feb 13. On Friday, Feb 17, when NOTHING had happened yet, I went to the hospital to be induced. After 8 hours on Pitocin, I was not progressing enough, so my Dr. sent me home and told me to come back the next Tuesday. I had a great nursing team - some sweet, patient ladies - who told me they were back on duty Tuesday, and they might see me again. Yeah, so nothing happened over the weekend. I got lots of confused looks when I went to church that Sunday (when everyone assumed I'd still be in the hospital holding my bundle of joy).

So on Tuesday, Feb 21 (EIGHT days after my due date!), I went back to the hospital, got back on Pitocin, and started over (with my same fabulous nurses). This time, Caroline was finally ready to come into the world. I was in labor about 9 hours and pushed for literally 5 minutes. (With my 1st daughter, it was 13 hours of labor and 1 full hour of pushing!)

Here we are about 10 minutes after Caroline Rose was born.
She was 8 lbs. 1 oz. and 21 inches.

Day 2: Our 1st photo as a family of four! This was when Annelise came to meet her new little sister. The first thing she asked was if she could hold her!

 Caroline is like a little carbon copy of Annelise. I'm so glad digital pictures have date stamps, or years from now, I might not know which girl is in the picture. Especially since we're reusing all of Annelise's clothes!

March 14 - Ready for bed. I still thought Annelise was my little girl until I saw her next to her newborn sister. Wow! All of a sudden she seemed so big. Sniff, sniff.

April 8 - Easter Sunday. Poor Caroline had such a huge case of baby acne. It was all over her body when she was born, and stayed on her face until she was about 2 months old. I know it doesn't bother them a bit, but I still felt sorry for her.

April 26 - Caroline's 1st visit to the Houston Zoo. As she grows, I hope she will love it as much as Annelise does.

May 20 - The day of Caroline's dedication at church. (This was after church, which is why Annelise's hair is so messy. Those boys in the nursery always pull on her bows!) Their clothes don't always match, but it's just so darn cute when they do!

June 17 - This is one strong little girl. She gives herself tummy time! She's been holding her head up for a while, and started rolling over at about 3 months (1st roll was on my birthday!). She loves watching her big sister, and I can tell she just wants to get up and run after her NOW! Annelise hit most of her milestones a little earlier than her peers, and I think Caroline will beat her on all of them!

 March 21 - One month old. Little miss bright eyes showed off for her 1st photo shoot. A friend from church does beautiful photography - especially of kiddos - and came to our house for this shoot.

***If you like our pictures and live in the Houston area, please check out Skyley Photography by Lori Smith on facebook. She gave us all our retouched pics on a CD (about 22 shots) for a great price, and we can print them all we want. Her retouching was fabulous - remember I told you about the baby acne - can't see it at all!***

Hard work for such a little girl!

She slept through most of the shoot, but looked so cute doing it.

And she comes by those gorgeous baby blues quite naturally. Annelise has them, too! (No retouching needed!)

If you're still reading after all these pictures, don't hold my blogging absence against me. I have plans to get some crafting done soon. And if I don't have time for crafting, I'll just force you to look at more pics of my beautiful daughters! Until then...

Happy crafting,
Julie

Saturday, February 18, 2012

Crafting with my Valentine

A few weeks ago, I finally got brave enough to paint with my toddler. It wasn't too bad. She actually cooperated while I needed her to (no more than 10 minutes!) and then she was rewarded by getting to play with the almost dry paint brushes and the newspaper I had laid out.

Here's what we made:

I found the inspiration for this craft on Pinterest (what did we do before that wonderful invention?). Here's the original from Handprint and Footprint Art.
Source: Handprint and Footprint Art
 I only made a few small changes from the original. I used craft paper and pink and red paints. Also, my handwriting was small enough that I had room to include Annelise's name and the year. My 2 year old's hand prints were just the right size to fit in a 5x7 frame. Older kids could make an 8x10 craft.

 And here's my little artist after her prints were made:
 I promise she's not licking the paint. She's showing her manners by (sort of) covering her mouth while coughing. Side note: this was also the first day we tried a full-on ponytail. Cute, huh?

We made prints for Daddy, both sets of grandparents, and her great grandmother.

Hope you found something fun to make with your little ones for the people they love!

Happy crafting,
Julie


Friday, February 17, 2012

Upcycled CD Photo Craft

Well, add this to the ever-growing list of "why didn't I think of that" crafts! When I picked my daughter up from Sunday School this past weekend, she had this adorable photo to give me (made by her teachers).

 Such a simple idea, but so cute! All you need is an old CD, some cute paper, and binder clips. You probably already have that in your craft stash!

And it's not just for Valentine's. I could see this in paper to coordinate with any holiday or your home decor. All you have to do is trace a few circles, cut them out, and glue them onto the CD. How easy is that? And I love that they covered the binder clips in matching paper.

 Here's the back.

And a close-up of the binder clips.

I would imagine you could do this in 15 minutes or less. It doesn't get better than that!

Okay, not that anyone actually reads my blog, but if you're out there - a little bit of news. I'm scheduled to be induced early Friday morning, 2/17. So I probably won't be posting any new projects for a while. Maybe just sweet newborn baby pics!!! Can't wait to add another sweet little girl to our happy home.

Happy crafting!
Julie

Monday, February 13, 2012

Minnie Mouse Pillow

I saw the cutest Minnie Mouse pillow on DisneyStore.com last fall, and knew I could make my own - easily and for less $$$. When I thought about a gift our new baby could "give" her big sister, Annelise, I thought the pillow would be perfect! It was pretty easy to make (1 nap time) and if you add shipping to the original, I probably saved $10 (could have been more if I'd had a coupon, but in your last week of pregnancy, you can't wait around for a coupon).

Here's my pillow, and the original from the Disney Store:

Not too bad, huh? Do you have a Minnie Mouse lover that you just NEED to make this for? Here's how:

 Supplies:
14x14 pillow form
1/2 yard Pink polka dot fabric (I've only found it at Joann)
fat quarter solid black fabric
12" zipper
Mickey silhouette
Lite Steam-a-Seam
sewing machine & basic sewing supplies

Cut two 15" squares for the pillow front and back (1/2" seams will be used throughout).

 I went to google images, typed "mickey mouse silhouette", and stretched it to fit an 8.5"x11" page. I like to use Lite Steam-a-Seam if I plan to sew around the edges or put it on clothing. Trace the mickey shape onto the paper backing that the sticky part is on (look between the two paper backing layers - it should be obvious).

 Peel off the non-sticky backing paper and iron the shape onto your solid black fabric.

Cut right around the mickey shape, peel off the remaining paper backing, center on one of your 15" squares, and iron it down.

I did a zig-zag stitch around the entire mickey shape. You could also just do a straight stitch near the edge. Since this is going in a toddler's room, I wanted it to be washable and durable.

 Pull the loose threads to the back and tie in a few knots for extra durability.

 Cut the fabric for your bows. You need a large rectangle that's 6"x8 1/2", and a smaller rectangle that's 3"x4". Fold the large rectangle in half with the short ends together and stitch around, leaving an opening on the bottom edge for turning. Fold the small rectangle lengthwise and stitch down the long edge, making a tube.

 Trim the seam on the tube to about 1/4". Clip the corners on the large piece, turn it right side out, press the raw edges in, and stitch a narrow seam on the open edge (not shown).

 Accordion fold the bow to your liking, and wrap the tube around the middle, folding in the raw edge about 1/2". (I ended up cutting about 1" off the tube - I just didn't need the full length to go around the bow.) Hand stitch the band, catching in some of the bow to keep it in place.

Stitch the bow to the top of your mickey shape, making sure it's secure.

 Press down 1/2" on one edge of each pillow front and back (the bottom edge of the mickey shape piece).

 Stitch your zipper to each folded edge, centering the zipper.

 With zipper OPEN, line up the right sides of your pillow, pin around, then stitch, coming in about 1" around the corners on the zipper ends. Clip the corners, then turn right side out. Poke out the corners and press the edges. Insert your pillow form and zip it up.

There you go! Go whip up a sweet pillow for a little girl you love who loves Minnie Mouse as much as Annelise does.

Happy crafting,
Julie