Love Story 3 column

Saturday, February 18, 2012

Crafting with my Valentine

A few weeks ago, I finally got brave enough to paint with my toddler. It wasn't too bad. She actually cooperated while I needed her to (no more than 10 minutes!) and then she was rewarded by getting to play with the almost dry paint brushes and the newspaper I had laid out.

Here's what we made:

I found the inspiration for this craft on Pinterest (what did we do before that wonderful invention?). Here's the original from Handprint and Footprint Art.
Source: Handprint and Footprint Art
 I only made a few small changes from the original. I used craft paper and pink and red paints. Also, my handwriting was small enough that I had room to include Annelise's name and the year. My 2 year old's hand prints were just the right size to fit in a 5x7 frame. Older kids could make an 8x10 craft.

 And here's my little artist after her prints were made:
 I promise she's not licking the paint. She's showing her manners by (sort of) covering her mouth while coughing. Side note: this was also the first day we tried a full-on ponytail. Cute, huh?

We made prints for Daddy, both sets of grandparents, and her great grandmother.

Hope you found something fun to make with your little ones for the people they love!

Happy crafting,
Julie


Friday, February 17, 2012

Upcycled CD Photo Craft

Well, add this to the ever-growing list of "why didn't I think of that" crafts! When I picked my daughter up from Sunday School this past weekend, she had this adorable photo to give me (made by her teachers).

 Such a simple idea, but so cute! All you need is an old CD, some cute paper, and binder clips. You probably already have that in your craft stash!

And it's not just for Valentine's. I could see this in paper to coordinate with any holiday or your home decor. All you have to do is trace a few circles, cut them out, and glue them onto the CD. How easy is that? And I love that they covered the binder clips in matching paper.

 Here's the back.

And a close-up of the binder clips.

I would imagine you could do this in 15 minutes or less. It doesn't get better than that!

Okay, not that anyone actually reads my blog, but if you're out there - a little bit of news. I'm scheduled to be induced early Friday morning, 2/17. So I probably won't be posting any new projects for a while. Maybe just sweet newborn baby pics!!! Can't wait to add another sweet little girl to our happy home.

Happy crafting!
Julie

Monday, February 13, 2012

Minnie Mouse Pillow

I saw the cutest Minnie Mouse pillow on DisneyStore.com last fall, and knew I could make my own - easily and for less $$$. When I thought about a gift our new baby could "give" her big sister, Annelise, I thought the pillow would be perfect! It was pretty easy to make (1 nap time) and if you add shipping to the original, I probably saved $10 (could have been more if I'd had a coupon, but in your last week of pregnancy, you can't wait around for a coupon).

Here's my pillow, and the original from the Disney Store:

Not too bad, huh? Do you have a Minnie Mouse lover that you just NEED to make this for? Here's how:

 Supplies:
14x14 pillow form
1/2 yard Pink polka dot fabric (I've only found it at Joann)
fat quarter solid black fabric
12" zipper
Mickey silhouette
Lite Steam-a-Seam
sewing machine & basic sewing supplies

Cut two 15" squares for the pillow front and back (1/2" seams will be used throughout).

 I went to google images, typed "mickey mouse silhouette", and stretched it to fit an 8.5"x11" page. I like to use Lite Steam-a-Seam if I plan to sew around the edges or put it on clothing. Trace the mickey shape onto the paper backing that the sticky part is on (look between the two paper backing layers - it should be obvious).

 Peel off the non-sticky backing paper and iron the shape onto your solid black fabric.

Cut right around the mickey shape, peel off the remaining paper backing, center on one of your 15" squares, and iron it down.

I did a zig-zag stitch around the entire mickey shape. You could also just do a straight stitch near the edge. Since this is going in a toddler's room, I wanted it to be washable and durable.

 Pull the loose threads to the back and tie in a few knots for extra durability.

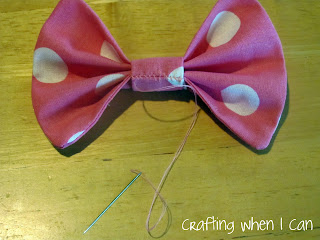
 Cut the fabric for your bows. You need a large rectangle that's 6"x8 1/2", and a smaller rectangle that's 3"x4". Fold the large rectangle in half with the short ends together and stitch around, leaving an opening on the bottom edge for turning. Fold the small rectangle lengthwise and stitch down the long edge, making a tube.

 Trim the seam on the tube to about 1/4". Clip the corners on the large piece, turn it right side out, press the raw edges in, and stitch a narrow seam on the open edge (not shown).

 Accordion fold the bow to your liking, and wrap the tube around the middle, folding in the raw edge about 1/2". (I ended up cutting about 1" off the tube - I just didn't need the full length to go around the bow.) Hand stitch the band, catching in some of the bow to keep it in place.

Stitch the bow to the top of your mickey shape, making sure it's secure.

 Press down 1/2" on one edge of each pillow front and back (the bottom edge of the mickey shape piece).

 Stitch your zipper to each folded edge, centering the zipper.

 With zipper OPEN, line up the right sides of your pillow, pin around, then stitch, coming in about 1" around the corners on the zipper ends. Clip the corners, then turn right side out. Poke out the corners and press the edges. Insert your pillow form and zip it up.

There you go! Go whip up a sweet pillow for a little girl you love who loves Minnie Mouse as much as Annelise does.

Happy crafting,
Julie

Friday, February 10, 2012

Casserole Carrier

Since I've had to borrow a casserole dish carrier from my mother-in-law several times in the last year, I figured I should probably just get my own. And since I'm due to give birth any day now, I didn't feel like looking everywhere for one. I came across two great posts that featured carriers and decided to make my own. I mostly followed the tutorial at 2 Little Hooligans with a few tips from Taylor Made.

Here's how mine turned out:


The original tutorial on 2 Little Hooligans used a dish with no handles, so I adjusted my cutting measurements to accommodate the largest dish I would want to carry. The idea for the cotton webbing handles and contrast inside fabric came from the post on Taylor Made.

My fabrics and the cotton webbing were all from Hobby Lobby, and I got Insul-Bright thermal lining from Joann's.

I made this late last week, just in time to take some goodies to a Super Bowl party. And oh, the goodies were good. I found some tasty morsels on Pinterest, and got a recipe for Bacon-Wrapped Smokies from Tasty Kitchen. (Sorry, didn't get a picture of the smokies, but Tasty Kitchen has a great pic of the finished product.)


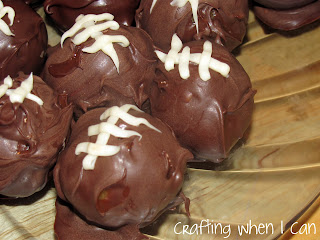
I also decided to make Nutter Butter Cookie Balls, found on Pinterest, recipe from Simply Designing. Much easier than cake balls, these only have 3 ingredients and there's no actual cooking involved!

I added "football laces" by melting white vanilla candy melts (Wilton) in a ziploc, then barely snipping the bag corner. They are not perfect, but you get the idea!

I've been bookmarking and pinning recipes for a while, but don't always get around to making all of the wonderful foods I've seen out there. I'm glad I tried these two recipes. They were both so easy, and big hits at the party!

Yesterday, I made a gift for Caroline to "give" Annelise when the first meet. I'm due next Monday, so I'll try to get the gift posted here over the weekend. It's super-cute! Until then...

Happy crafting,
Julie
Monday, February 6, 2012

Annelise's Big Girl Room, Part 1

I've just about finished my 2 year old's new big girl room. There are still a few finishing touches to complete, but I have a first glimpse for you today.

BEFORE
AFTER
Okay, so the wall in the before picture looks peach, but I promise, it's the same soft yellow as the after picture. The best part of her room redo was NOT having to repaint the walls! The paint is called Bellissima and we got it from Walmart (Kilz paint). I'm not sure they carry it anymore though. I did repaint several furniture items - including the bench seen here - in Gum Drop from Krylon (spray paint in gloss finish).

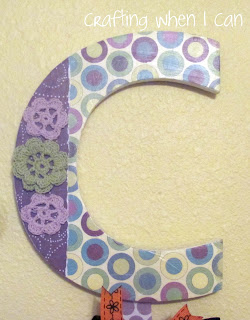
My main craft project for this room redo was some bow holders. Since Annelise has 8 letters, and I didn't want to take up that much wall space, I opted to use her initials. Here's how I made the bow holders:
All supplies are from Hobby Lobby. The chipboard letters are $1.77 each and are about 10" tall. The papers are from My Mind's Eye Penny Lane (single sheets at HL). The crochet flowers were from the scrapbook embellishment aisle, and the ribbon from the fabric area. (I originally planned to use the stamps and ink pad pictured here, but didn't use them in the end.)

 I don't have any step-by-step photos, but the process was pretty simple. I painted the letter edges with 2 coats of white craft paint. Then I traced the letters (upside down on the back of the scrapbook papers) and cut them out of the paper, adding some torn-edge pieces to each letter. I mod-podged the papers to each letter and sealed with a couple coats on top. Then I hot-glued the crochet flowers on top and the ribbon strips (about 2 feet each) on the back.
 
 I also hammered in some picture hanging brackets (also from HL). I had no idea if this would work, but they went in very easily and are holding up fine so far!

 Here are close-ups of each initial:


 I hope you enjoyed this first look at our toddler's big girl room. I hope to have some more to show you soon. Of course, baby #2 is due a week from today, so all our current plans have to be very flexible right now!

Happy crafting,
Julie