Love Story 3 column

Friday, April 15, 2011

Baby Name Banner - Tutorial

I've hinted at a sweet baby name banner for about a month now. The shower for the beautiful mom-to-be has now happened, so I can finally show you the banner and tell you how to make one.


What you need:
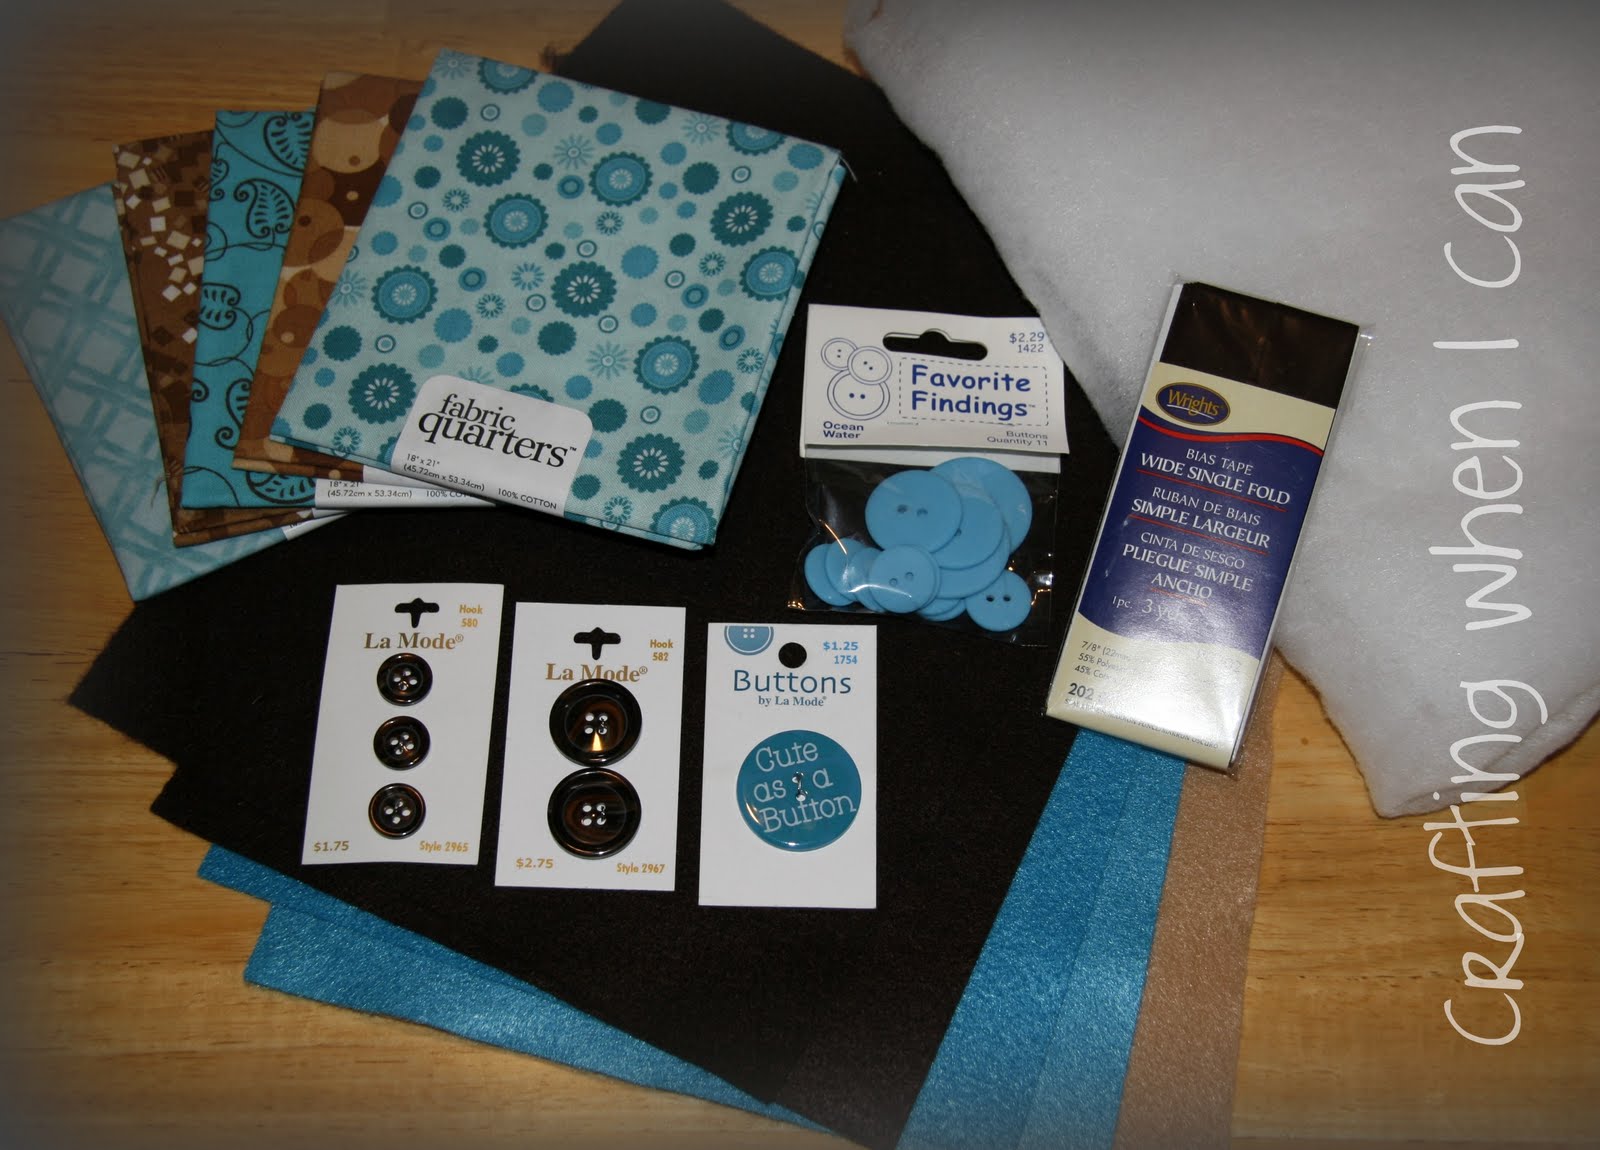
Coordinating fabric (I used 5 fat quarters, which was plenty for 6 blocks)
Batting (I used scraps from another project)
Binding - wide double fold (The store was out so I had to buy single fold and iron it in half myself.)
Felt
Embellishments (I used buttons)

The "Jude" banner is approximately 42" long. My finished blocks are approx. 7" square. Your finished banner - and the exact amount of fabric you will need - depends on the number of blocks you need to spell your chosen name. Since Jude is a short name, I added two "picture" blocks. For a 3-4 letter name, I suggest adding 2 blocks; 1 block for a 5-6 letter name; and for any longer names, just the letters should be plenty long.

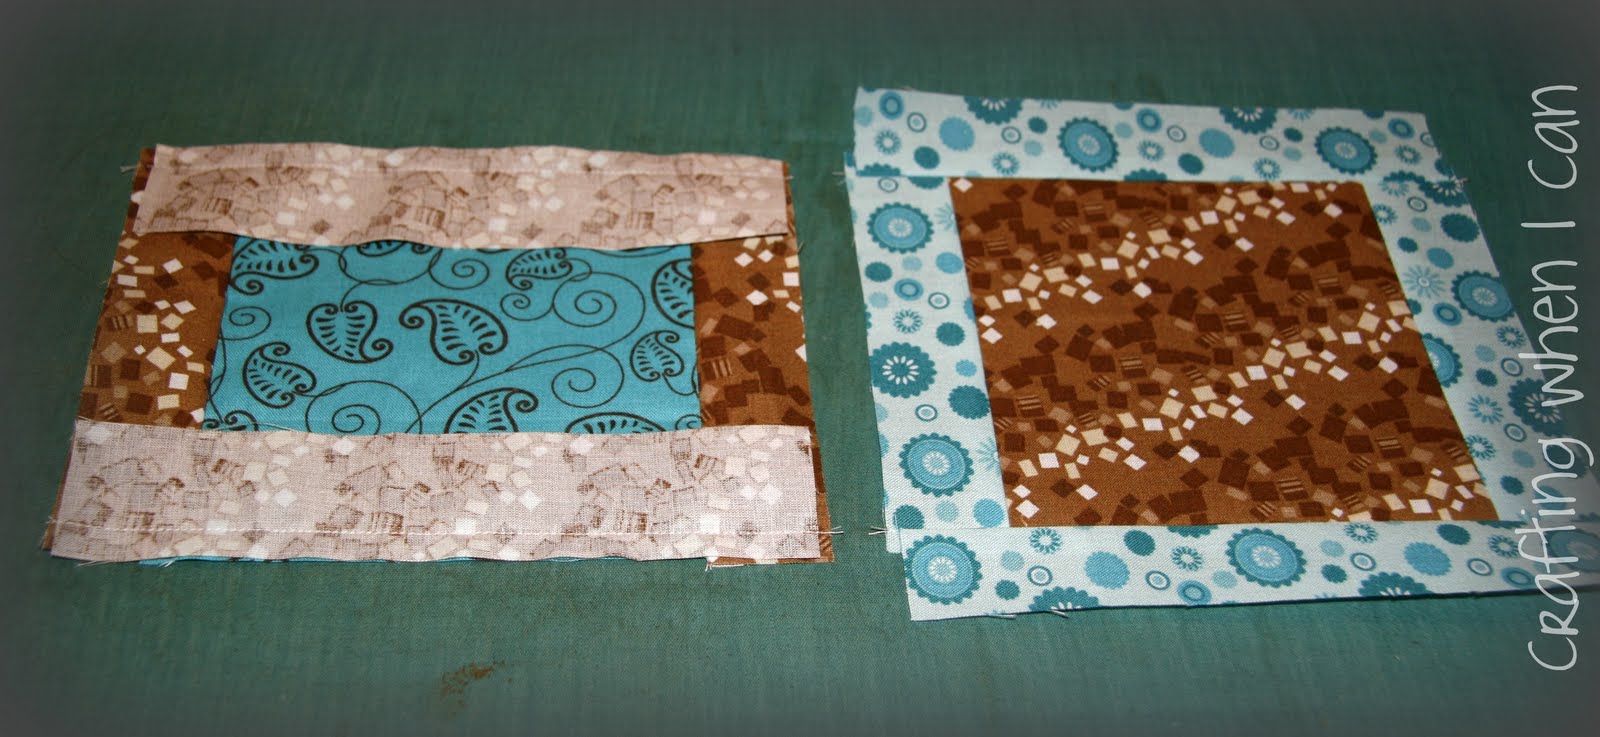
1. Cut a 5 1/2" square for each block. The center panel of each block is 5" finished.


2. Cut 1 1/2" by 5 1/2" strips - two strips per block.


3. Cut 1 1/2" by 7" strips - two strips per block.
(Pretend not to notice the strips in the picture are actually 6 1/2" long. When you're making something up as you go, mistakes are really easy to make.)


4.Cut 7" squares for the backs of the blocks.

5. Cut 7" squares of batting.

6. Sew a 5 1/2" strip to opposite sides of each 5 1/2" square block center. *All seams are 1/4" unless otherwise noted.* Press the strips away from the square.


7. Sew a 7" strip to each side of your block, opposite the sides you sewed the previous strips. Press each strip away from block.

8. At this point, it's time to cut your letters and any other shapes you want to add. I used Word Art in Microsoft Word to make my letter templates. I used Arial Black, typed one letter at a time, and formatted the Word Art size to 3"x4". This way all my letters would be the same size. I printed each letter twice, then free-handed a line about 1/8" larger than one set of letters. Cut out the smaller letters from your main color of felt, and the larger letters from the letter background color.

For any pictures you want to use on extra blocks, you can use clip art, Google images, cookie cutters, whatever you can find.

9. Arrange your letters and shapes on the blocks and stitch close to the edge of each. I layered my main letter and background and stitched through both at once.

10. Layer your batting, block front, and backing piece as shown (the block front and backing piece should be right sides together).

11. Stitch around the square, leaving about 1 1/2" on the top edge open for turning. (If I made another banner, I would only stitch around the sides and bottom, leaving the top completely open.)

12. Turn the blocks right side out and press. Use a point turner or dull pencil point to poke out the corners. Don't worry about stitching up the opening you used to turn the square out. This will be enclosed in the binding later.

13. Stitch "in the ditch" between your main block piece and the borders.

14. Decide where you want to use your embellishments and stitch in place.


15. Lay out your blocks (I spaced mine 1" apart) and cut your binding that length plus 24". Leave 12" of binding at each end (for tying) and pin your blocks, enclosing the top edge in the fold of the binding. Fold each binding end in about 1/4". Sew along the full length of the binding, removing the pins as you go.


16. Cut two 13" lengths of binding. Fold in each end 1/4". Sew along the length of both binding pieces. Place at the ends of your banner, overlapping the beginning or end block about 1". Sew in place at the end of the binding and at the edge of the block.


And that's it! You can tie the banner to the front of the crib, a shelf with pegs, or decorative knobs on the wall. I believe every baby should have something that was handmade just for them!
 
I hope my instructions were clear enough to follow. If you have any questions, please let me know. I'd be glad to elaborate on any of the steps.

Happy crafting,
Julie

Thursday, April 14, 2011

Hello Spring!

Here's a cute little spring outfit I made for Annelise. The pattern is Simplicity 2375. The aqua fabric and pink ribbon (on hair bow) are from Walmart, and the brown fabric and ribbon are from Hobby Lobby. There's a jacket, long-ish sleeveless top with straps that criss-cross in the back, and knee-length bloomers. (Our little photo shoot was post-nap, so there are wrinkles everywhere, but she was in a good mood, so we went with it!)


Without the jacket.

Criss-cross straps in the back. (She got 2 houses away before I caught up!)

Not great lighting in the house, but I couldn't resist showing you her amazing blue eyes!
I'm still working up the tutorial for the baby name banner, so I thought I'd show you something quickly today. Hopefully my little cutie will inspire you to get out and smell the roses. We are having great weather in Texas this week (although we desperately need rain). Get out and see a little of God's beautiful world!

Happy crafting,
Julie

Monday, April 11, 2011

Spring Table Runner

Gosh, I've got to get better about posting more often! Anyone who knows me personally will tell you I'm a huge procrastinator. Always have been, probably always will be. Oh well, I do about half the best I can! (hehehe)

I have actually made a few things since my last post, I just either haven't taken any pics, haven't downloaded pics from the camera, or just haven't gotten around to composing a post. Here's one of my latest creations...


I've told you how much I love the Weekend Wrap-up Link Party at Tatertots & Jello. A few weeks ago, I found the tutorial for this table runner through the link party. You can find all the instructions at Diary of a Quilter. Amy Smart's tutorial is very well-written with lots of great pictures. If you are comfortable sewing, you should be able to follow along easily. This was a 3-nap project for me: 1 nap for cutting and arranging the fabric strips; 1 nap for piecing and quilting; and 1 nap for the binding.

I would love to show you how great this runner looks on my dining table, but it's currently covered in crap craft stuff and other junk. I have to clean it off before Easter, so I'll try to get a good pic then. For now, the stairs were about the cleanest surface I could find to use as a backdrop. (I'm a crafter, not a cleaner!)

Here are a couple of close-ups:


I'm really branching out here, color-wise. My house is mostly decorated in red, white, and blue Americana. Pastels just aren't something I'm usually drawn to. But I thought for spring/Easter, I would make an exception. the colors aren't coming out quite as vivid as they are in person, but the back is a limey spring green. I can use the runner on either side.

As hinted at a couple of weeks ago, I have a baby name banner tutorial coming up. The baby shower for the recipient was yesterday, and I wanted the mommy-to-be to see it first. Hopefully I'll have it up in the next day or two. Until then...

Happy crafting,
Julie

Friday, April 1, 2011

I Love MOPS!!!

There are two really big reasons I love MOPS. (If you're not familiar with MOPS, it stands for Mothers of Preschoolers, and is a national organization.)

1. I get to visit with other moms who have become great friends. We learn together about how to be better moms through a video curriculum, guest speakers, and discussion.

2. We get to make a craft at the end of each meeting (while our kids are in childcare!!!). Monograms have been popular for a while, so I was excited to see what we were making today. Check it out...


It's genius how simple it is, but it's so cute. It's a piece of 1x6 glued to a candlestick. We painted the wood, stenciled a letter to a square of burlap, then nailed it right on. How easy is that? Here's a close-up:


Clearly I need to touch up a couple of spots that somehow missed being painted. And pretend not to notice that I stenciled the "M" backwards. At least it's one of those letters that basically looks the same either way!

Some of the moms had ideas about how to take this craft and run with it. You could use different heights of the candlestick and put several together. You could also spell out a word (like "joy" for Christmas) or use the first initials of everyone in your family.

Thanks, Becca, for such a cute craft this week!

Happy crafting,
Julie

Wednesday, March 30, 2011

Easter Book for Toddlers

I've already bought a few things for Annelise's Easter basket, but wanted to add a board book with some sort of Easter/spring theme. I strolled down Walmart's book aisle on Monday and saw several Easter board books. The first few I looked at were just cheesy, happy, fluffy books about chicks, lambs, bunnies, etc. That's not quite what I was hoping for. Then I noticed this book:


Sure, there's a church on the cover, but was it just going to be another bunch of fluff? I quickly read the book and was very pleased to find a clear, yet age-appropriate, true Easter message. I was happy to plunk down $6.27 plus tax. Here's a little look inside:


The book begins by asking what Easter is really about. It mentions all the secular aspects of the holiday - bunnies, chicks, egg hunts, toys, candy,...


and fancy new church clothes and shoes. (I've already bought Annelise a pair of white patent shoes to go with her Easter dress!)


And then comes the reason I really loved this book. "Easter means much more than that. It's all about God's Son." Now we're getting somewhere.


It tells that Jesus died to save us from our sins and rose again on the third day. I appreciate the fact that there's no mention of the agony and torture Jesus experienced. I don't believe that should ever be sugar-coated, but I also know toddlers aren't ready for that. Also, as pictured on the page above, there are three crosses, but Jesus is not depicted on the cross. Another visual not for toddlers.

Several of the pages offer opportunities for parents to add more details and discussion as their toddlers get older, such as a picture of an empty tomb with an angel talking to three women.

Oh, and another aspect I know my SIL Kimberly would appreciate - multi-cultural people!


In the end, this book concludes that the fun, secular aspects of Easter - like bunnies, eggs, and candy - are okay. As long as you know that the most important part is Jesus, and what He did for the world when He sacrificed His life to save us. (Which is just what I happen to believe. I plan to let Annelise get "Santa gifts" at Christmas, but Jesus is the reason for that season, too! I think a little bit of the secular is alright, as long as the family's beliefs are just as big a part of the celebration.)

If you're a believer looking for a way to begin teaching even the youngest children about the true meaning of Easter, I hope you will look for this book. And while I bought it for my daughter's Easter basket (and may still tuck it in with her other goodies that morning), it will be part of our reading time until then, and maybe even after. I'm pretty sure we've read it three times already since yesterday!

Here are some more details about the book:
Author: Michelle Medlock Adams
Illustrator: Amy Wummer
Publisher: Candy Cane Press (a division of Guideposts)

Happy crafting and happy Easter!
Julie

Tuesday, March 29, 2011

Sewing for Myself?!?

I used to sew clothing for myself all the time. My, how having a daughter changes things! Since Annelise was born almost 16 months ago, I have only sewn for her. I decided she had enough for now - it's Mommy's turn again! Of course, there's nothing like a full-length photo of yourself to reinforce the need for a diet. Yikes! I won't be showing you the full-length shot, but here is a look at Mommy's new dress.

It all started with this pattern, Simplicity 2642 (pretty sure I got it at Hobby Lobby when they had a $.99 sale):

I made the view seen in the upper right corner. It's a pretty easy pattern, if you're comfortable with sewing and using a pattern. The sleeves are not set-in! I thought the dress would look good with a "flowy" fabric, so I found this fabric at Joann's (reg. price was $9.99/yd, and I used a 50% off coupon).

The only adjustment I made to the pattern was to add about 2 inches to the skirt hem (before I cut it out). I don't like my knees, and wanted it to be just below my knees. My favorite feature? It has pockets!

 So here's the finished product, along with my modeling helper...


(There was just a bit too much afternoon sun, so we were squinting a bit.)

Now the next question is when to start my diet. Hmmmmm... at least not until after the Easter candy has been eaten!!!

My next post will have nothing to do with crafting. I've got a little book review for you.

Until then, happy crafting,
Julie