Yikes! It's been almost a month since I posted. It's not that I haven't been crafting. I've actually made several projects. I just haven't gotten around to taking photos. So this morning, Annelise and I had a marathon modeling session, and I got pics of her in three new outfits. I will show you one of those outfits today, and save the other two for additional posts. I have to keep you wanting more, right?
So if you've read any of my previous posts, you've probably seen the "Charlotte" dress I made with a pattern from Mama Stellato. When I bought that pattern, she had a 2/for deal, and I also got the "Lovely" dress pattern. I used the rest of the coordinating fabric from the Charlotte dress I made on this new dress. Here it is:
I made the dress exactly as the pattern directed. The only direction I didn't follow exactly was the bodice size I used. The bodice is sized to fit snugly, and I knew I was going to put it over a long-sleeved onesie, so I used the next size up. Since this version is made in corduroy, my daughter wore it over the onesie and tights for church. The buttons (from Walmart) are merely decorative, as you can see in the pic above that one strap has hidden snaps. The fabric is from Hobby Lobby (there go those angels singing again!).
Unfortunately, I don't have a picture of her in the brown dotted dress, but you can see her in the 2nd version of the Lovely dress I made here:
No, I can't get a picture of her smiling these days. In fact, the only way I can get her to stand there at all is goldfish bribery!
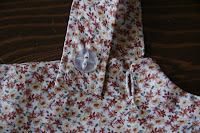
Here's a view of the back. I made a couple of changes to the original pattern for this version. Since I wanted this to be a spring/summer top, I made the skirt portion half the length. Also, the pattern calls for one strap to be permanently attached, while the other strap attaches with snaps (see pics of brown dress above). Here, I made both straps functional, using buttons and buttonholes (see next 2 pics below). On a side note: Do you like the rubber bands on the hutch knobs? She figured out how to open those doors as soon as she could stand up.
 |
| Strap buttoned up. |
 |
| View of working buttonhole. |
 |
Okay, I couldn't resist showing you the booty shot! She's picking up a goldfish I threw to "encourage" her to step away from the camera. We do what we have to, right?
And this photo is here because I just can't resist her gorgeous eyes!
Thanks for taking a peek into our world today! My next post will be a tutorial on the easiest dress you can make for a child. And I promise to post it before another three weeks goes by!
Happy crafting,
Julie
Linking up to the following:
Linking up to the following:


what a cutie! I love the green buttons on the first dress.
ReplyDeletemegan
craftycpa.blogspot.com
very cute!!
ReplyDeleteAdorable! Love the snaps!I am visiting from Weekend Wrap Up party and I am a new follower!
ReplyDeleteHope you have a great weekend!
Michelle
www.delicateconstruction.blogspot.com
I love that! You are so lucky that you get to sew for your cute daughter...how fun!
ReplyDelete